Visual Studio 2005 – Source Control Warnings (or lack thereof)

I’ve just had to apologise to my peers for breaking the build (thankfully not something that happens often).  I encountered an interesting situation where writeable files don’t show as such (a build script had ‘got latest’ but left files writeable).  I then made some changes and performed an incomplete checkin as half of the changed items weren’t checked out.  Visual Studio interestingly showed all of the files as ‘locked’ even though they were writeable.  VS2003 used to detect that and give you a different type of ‘tick’ to show the file was writeable but not checked out (I think 🙂 ).


‘Silly boy’ – I hear you cry – yes I should have done a get latest before checking in (but didn’t – my bad).  This does highlight however the Source Control settings available in the Tools–>Options dialog.  We enforce Checkin comments (through a VSS Addin) and so for safety (knowing what VS2005 is doing with VSS) it’s always worth ensuring the following are enforced:


  • Prompt before checkout
  • Prompt before checkin (to allow comments)
  • Don’t allow editing of checked-in items
  • Checked-in item behaviour

    • On Save – prompt for checkout
    • On Edit  – prompt for checkout

I’d changed some of these items in the past week but some had reverted to previous settings (a little concerning!!).


Anyway – it’s all good – the build passed and I’m a little wiser about what options to tick in future.

Visual Studio 2003 Colours – Registry Entries

Visual Studio 2003 doesn’t give you any way of exporting your customised colours (I’ve gone for a ‘black’ theme) – well, black is the new black you know!


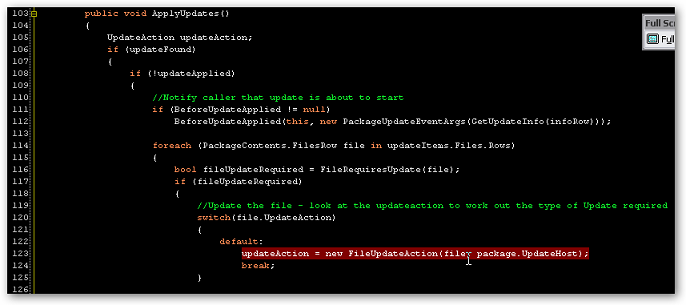
The theme’s shown below (not that it’s that great – but illustrates the effect the registry entries (further below) have…  In Visual Studio 2005 of course you can simply export your entire settings.  Oh yeah – also ignore the code as that’s simply a work in progress for something I’m going to post on CodeProject in the next couple of months.


To create this look – simply copy the text below and save in a .reg file.  Take a backup of your current colours first of course by exporting the key: [HKEY_CURRENT_USER\Software\Microsoft\VisualStudio\7.1\FontAndColors] to a file.  I’ve got some ReSharper v2 settings in there too so you can remove those if you don’t use ReSharper (shame on you!)


Windows Registry Editor Version 5.00


[HKEY_CURRENT_USER\Software\Microsoft\VisualStudio\7.1\FontAndColors]
“Color Palette”=hex:ff,ff,ff,00,ff,ff,ff,00,ff,ff,ff,00,ff,ff,ff,00,ff,ff,ff,\
  00,ff,ff,ff,00,ff,ff,ff,00,ff,ff,ff,00,ff,ff,ff,00,ff,ff,ff,00,ff,ff,ff,00,\
  ff,ff,ff,00,ff,ff,ff,00,ff,ff,ff,00,ff,ff,ff,00,ff,ff,ff,00


[HKEY_CURRENT_USER\Software\Microsoft\VisualStudio\7.1\FontAndColors\{A27B4E24-A735-4D1D-B8E7-9716E1E3D8E0}]
“Colorable item format version”=dword:00000008
“FontName”=”Monaco”
“FontPointSize”=dword:00000008
“FontCharSet”=dword:00000000
“Plain Text Foreground”=dword:00ffffff
“Plain Text Background”=dword:00000000
“Plain Text FontFlags”=dword:00000000
“Line Numbers Foreground”=dword:00c0c0c0
“Line Numbers Background”=dword:00000000
“Line Numbers FontFlags”=dword:80000000
“Collapsible Text Foreground”=dword:0000aaaa
“Collapsible Text Background”=dword:00000000
“Collapsible Text FontFlags”=dword:00000000
“Comment Foreground”=dword:002cef10
“Comment Background”=dword:02000000
“Comment FontFlags”=dword:00000000
“Current Statement Foreground”=dword:00000000
“Current Statement Background”=dword:0000ffff
“Current Statement FontFlags”=dword:00000000
“HTML Element Name Foreground”=dword:008080ff
“HTML Element Name Background”=dword:02000000
“HTML Element Name FontFlags”=dword:00000000
“HTML Operator Foreground”=dword:004080ff
“HTML Operator Background”=dword:02000000
“HTML Operator FontFlags”=dword:00000000
“HTML String Foreground”=dword:0000ff00
“HTML String Background”=dword:02000000
“HTML String FontFlags”=dword:00000000
“HTML Tag Delimiter Foreground”=dword:0000ffff
“HTML Tag Delimiter Background”=dword:02000000
“HTML Tag Delimiter FontFlags”=dword:00000000
“Identifier Foreground”=dword:00dfdfdf
“Identifier Background”=dword:02000000
“Identifier FontFlags”=dword:00000000
“Keyword Foreground”=dword:00538bff
“Keyword Background”=dword:02000000
“Keyword FontFlags”=dword:00000000
“Other Error Foreground”=dword:0000ff00
“Other Error Background”=dword:02000000
“Other Error FontFlags”=dword:00000000
“Preprocessor Keyword Foreground”=dword:00c0b4f3
“Preprocessor Keyword Background”=dword:02000000
“Preprocessor Keyword FontFlags”=dword:00000000
“ReSharper Completion Replacement Range Foreground”=dword:00e1e4ff
“ReSharper Completion Replacement Range Background”=dword:00000000
“ReSharper Completion Replacement Range FontFlags”=dword:00000000
“ReSharper Current Line Foreground”=dword:00ffffff
“ReSharper Current Line Background”=dword:00313131
“ReSharper Current Line FontFlags”=dword:00000000
“ReSharper Matched Brace Foreground”=dword:01000000
“ReSharper Matched Brace Background”=dword:00ffff00
“ReSharper Matched Brace FontFlags”=dword:00000000
“ReSharper Method Identifier Foreground”=dword:008b8b00
“ReSharper Method Identifier Background”=dword:01000001
“ReSharper Method Identifier FontFlags”=dword:00000000
“ReSharper Operator Identifier Foreground”=dword:008b8b00
“ReSharper Operator Identifier Background”=dword:01000001
“ReSharper Operator Identifier FontFlags”=dword:00000000
“ReSharper Read Usage Foreground”=dword:01000000
“ReSharper Read Usage Background”=dword:00face87
“ReSharper Read Usage FontFlags”=dword:00000000
“ReSharper Usage Foreground”=dword:01000000
“ReSharper Usage Background”=dword:00face87
“ReSharper Usage FontFlags”=dword:00000000
“ReSharper Write Usage Foreground”=dword:01000000
“ReSharper Write Usage Background”=dword:00c1b6ff
“ReSharper Write Usage FontFlags”=dword:00000000
“String Foreground”=dword:0034cb65
“String Background”=dword:02000000
“String FontFlags”=dword:00000000
“XML Doc Comment Foreground”=dword:002cef10
“XML Doc Comment Background”=dword:02000000
“XML Doc Comment FontFlags”=dword:00000000


Using Batch Build in Visual Studio

This is a really simple one, but if you want to build a solution in a specific ‘Configuration’ and you have a big solution open, it can sometimes be an awfully long time to switch configurations – e.g. Debug -> Release.  You may find yourself needing to do this when you’re needing to build and rebuild setup projects whilst testing.


You could of course run a command line compile, but a simple way to stay in the IDE and Debug configuration whilst running a Release build is the Batch Build facility. 


Just go to Build –> Batch Build, then select all the Release versions of the projects you want to build (or whatever you want to build), and then click Build.  The settings will be remembered for the next time you go in too…


I said it was simple. 

Beware the unseen checkout in Visual Studio Setup Projects

I was inadvertently responsible for a broken build this morning as I checked out a Setup Project last night in Visual Studio 2003 that ended up checking out a merge module that was included in the Setup.  This merge module is built and subsequently stored in SourceSafe (I know – it shouldn’t be! – this is a temporary measure) by the build script, and the build failed as the .msm output file was checked out to me.


Shouldn’t Visual Studio prompt you when you check out?

The project was checked out in Visual Studio and it gave no warning that the .msm was also going to be checked out.


In other setup projects you’ll often find that other files will appear in the Check Out dialog (i.e. you’re about to check  out all the ‘files‘ that have been explicitly included into your setup – from their source location).  As a matter of course it’s wise to first untick everything (right at the top), and then select only the .vdproj file to actually check out.


Why didn’t it prompt in this case?

The problem in this case appears to be that the offender is a merge module and was added to the setup project as such rather than as an included ‘file’.  It seems that Visual Studio neglects to mention merge modules when you check out as it probably thinks they’re static and not something it should worry you about! (which is probably true – yadayadayada)


How to prevent this happening to you

Well, while this file is still in VSS there’s little option but to just be vigilant whenever you check out a setup project that includes it. Either check out in VSS Explorer or if in Visual Studio -go immediately to VSS and undo the offending checkout.  Another option is to add some more resilience into the build and somehow force an undo-checkout (as no one other than the build should be updating the file).  A variation of this is to disallow checkout for all but the user running the build process through SourceSafe Admin (but this is a pain to administer), and the final and best solution is to remove the need to store the merge module in Source Control by sorting out cross-dependencies in different components so that they all pick the file up from the same central location.


.NET Class Wizard disappearance

It finally happended today.  The thing that’s plagued so many other people who’ve installed and uninstalled multiple Visual Studio addins.  My C# Class, Form (and probably every other) wizard gave up the ghost which meant no new projects or new classes because the wizards had got themselves in a twist. 

It happened at work today so I googled and luckily got sorted out within 5 minutes!  If you’re in the same fix then look here as that very quickly did the trick for me!  I didn’t need to go as far as reinstalling the scripting engine thank goodness.

You might need to alter paths a little as your extensibility.dll may be in a publicassemblies folder (like mine) rather than the IDE fiolder.  dir /s should sort you out anyway

Looks like they still haven’t sorted out the ReSharper installer then!

Visual Studio Steup Project Bug

I found a cracker of a bug (undocumented feature) this morning that was keeping me ‘amused’ for a couple of hours.  I was trying to use Visual Studio 2003 Installer to create a Setup package to actually deploy setup packages (yes, you read correctly!) to a number of ‘deployment’ servers.  These are localised servers where users pick up new versions of software (we’re not quite at one-click deployment yet 🙂 ).


I was using a checkbox dialog to give options on which servers to deploy to, and was then using the properties set in the dialog to control whether the specific ‘custom folders’ (public shares on the different servers) were deployed.  This doesn’t work!

You actually have to ensure that you don’t specify a condition at the folder level, and then select all files and add the condition there (for all files). 

I think the documentation fairy neglected to mention that one!Â